
- Home
- Blog
- Blog Post Formatting Guides
- How to Combine Table Rows and Columns in WordPress – A Step-by-Step Guide
How to Combine Table Rows and Columns in WordPress – A Step-by-Step Guide
Tables can significantly enhance the readability and structure of your WordPress blog posts, but they often require customization to better suit your needs.
Whether you’re working with WordPress’s Gutenberg block editor or the Classic editor, merging table rows and columns is a valuable skill to master.
In this tutorial, you’ll learn how to combine table rows and columns like a pro. The step-by-step process, explained for both Gutenberg and Classic editors, will help you create cleaner, more professional tables.
👉 Watch the video below for a visual guide that complements this tutorial.
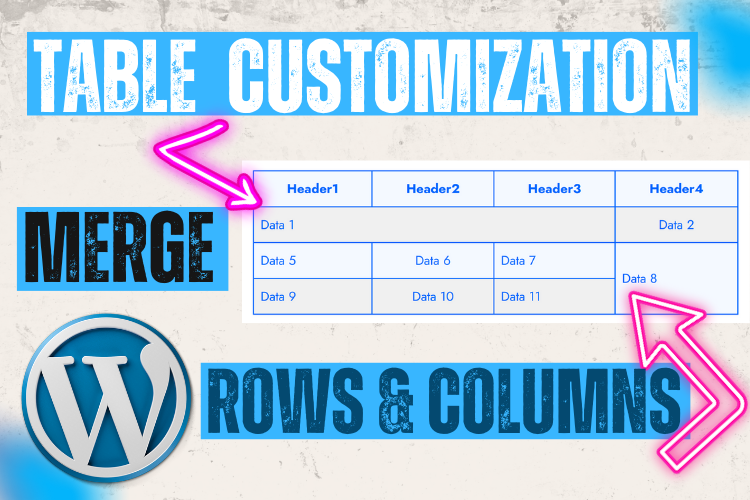
Combining Table Rows and Columns in WordPress
Why Merge Rows and Columns in WordPress Tables?
Merging rows and columns can declutter your table, align data for better readability, and enhance the visual appeal of your content. This method is particularly useful when consolidating related data under single headers or creating layouts for detailed comparison.
Steps to Merge Rows and Columns Using Gutenberg
Step 1: Open the Post in Gutenberg Editor
Navigate to your WordPress dashboard, click Posts, and select the post you want to edit. Open the post using the Gutenberg block editor.
Step 2: Access the Table Block
Click on the table you wish to edit. Locate the three-dot menu at the top-right corner of the block toolbar and select Edit as HTML.
Step 3: Merge Rows
- Identify the rows you want to merge by searching for the relevant
<td>tags. - For instance, to combine data one and data two, locate the
<td>tag of data one. - Add the attribute
colspan="2"immediately after the<td>tag to merge two cells horizontally.
Step 4: Merge Columns
- To merge data eight and data twelve vertically, locate the
<td>tag for data eight. - Add the attribute
rowspan="2".
Step 5: Clean Up Extra Cells
Remove any additional <td> tags or data that extend beyond the merged cells to ensure proper alignment.
Step 6: Save Changes
Click Save or Update. Refresh the post on the front end to see your merged table.
Merging Rows and Columns in the Classic Editor
Step 1: Open the Post in Classic Editor
From your WordPress dashboard, open the desired post in the Classic editor.
Step 2: Switch to Text Mode
Switch to the Text view of the editor to access the HTML structure of your table.
Step 3: Edit Table Code
- For row merging, add
colspan="2"to the<td>tag of the starting cell. - For column merging, use
rowspan="2".
Step 4: Remove Extra Cells
Just like in Gutenberg, remove unnecessary <td> tags to avoid misalignment.
Step 5: Save Changes
Click Save Draft or Update, and preview the post to ensure the table appears as intended.
Troubleshooting Common Issues
- Misalignment: Ensure there are no leftover
<td>tags after merging. - Unexpected Breaks: Check that all
<td>and<tr>tags are properly opened and closed. - Header Overlaps: Adjust header alignment by merging cells under the correct headers.
“The devil is in the details,” as they say, so careful attention to the HTML structure is essential when merging cells.
Tips for Optimizing Your Tables
- Use Consistent Dimensions: Ensure table rows and columns have balanced spacing.
- Test on Mobile: Preview your table on different devices to ensure responsiveness.
- Leverage Plugins: Tools like TablePress can simplify complex table formatting.
FAQs
Conclusion
Merging table rows and columns in WordPress is a simple yet impactful way to improve your content’s clarity and design. Whether using the Gutenberg editor or the Classic editor, following these steps ensures a professional finish.
👉 Watch the video above for a detailed walkthrough of the process.
Need further assistance? Contact us here or drop a comment below. Don’t forget to subscribe to our YouTube channel for more tutorials and tips.


